HBE-Arduino Sensor

Basic sensor experiment trainer with Arduino MCU without C language experience

  • Block program tool for easy understanding from other fields not knowing Electronic engineering
  • No need of Hardware knowledge for Input and Output
  • Accessible and controllable easily of 20 kinds of I/O and sensor devices
  • Able to check the result of program due to compiled and downloaded with a button
  • Available of various applications with Bread board

Introduction

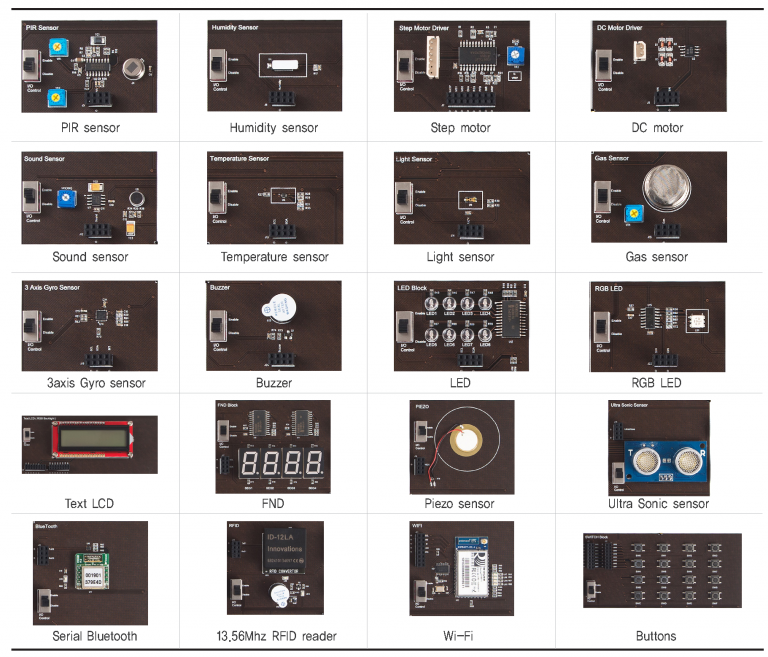
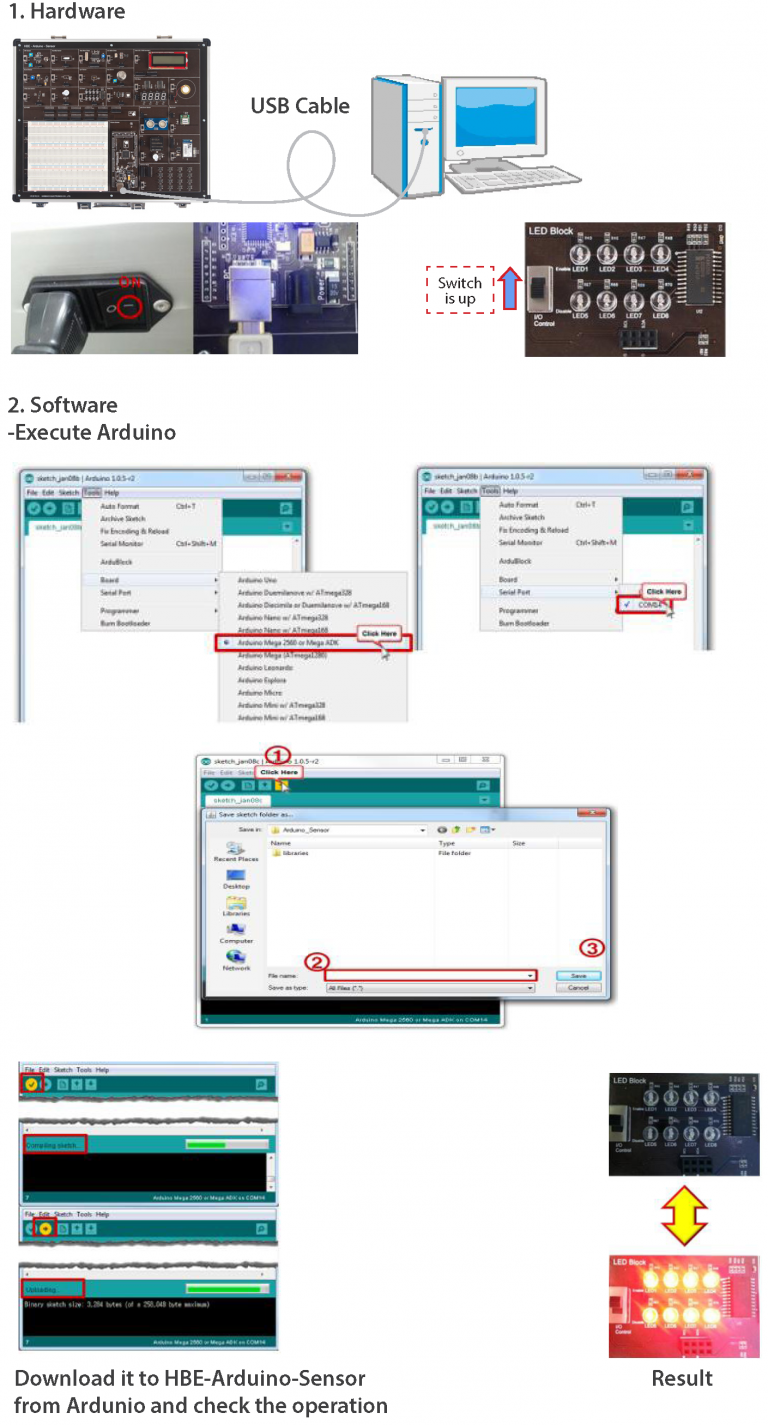
Ardunio is Open Platform, which can check the result of Control without studying Electronic engineering or Computer engineering , because this makes various Hardwares with so easy language. This provides own Software so we do not need other information. We can compile and download at a time if connecting Hardware with Jumper cable, programming with Block building program and pushing a button. And we do not need to know the function of Compile and Download. We can see the result immediately and we have increased interests so this will help us use other system. From the process to solve questions of operation one by one continuously, we can study how to control various devices. We can use this to various fields after studying how to use various sensors. This provides Bread board and Ext.Power so user can make other circuit by themselves.

Features

  • Ardunio IDE provided
  • Completely compatible with Arduino Standard Shield
  • Programmable immediately to block program just with basic circuit without wiring
  • Designed for wiring to desired pin
  • The latest version Ardunio 1.0.5.
  • Bread broad and various Powers usable for application
  • 20 kinds of I/O device
  • Available to controlled by Smart phone with built-in Bluetooth and Wireless LAN. (Note : Android App is not provided)

Product Specifications

Main configuration

Circuit in HBE-Arduino-Sensor is composed enough to make us understand the system basically. And this provides Bread board and various Voltages. We can use Bread board to make application circuit and test it.

1. PIR sensor
2. Humidity sensor
3. Step motor
4. DC motor
5. Sound sensor
6. Temperature sensor
7. Light sensor
8. Gas sensor
9. 3 axis Gyro sensor
10. Buzzer
11. LED 8EA
12. RGB LED 1EA

13. TEXT LCD
14. FND 2EA
15. Piezo sensor
16. Ultrasonic Distance sensor
17. Bluetooth module
18. DC voltage( +12V, +5V, +3.3V)
19. Wiring port(corresponded to no.21 port)
20. Bread board
21. MCU module(compatible with Arduino Shield)
22. 13.56MHz RFID reader
23. WLAN module
24. 16EA Buttons

Block diagram

Training Contents

Learning HBE-Arduino-Sensor Arduino programming

1st week. AVR Microcontroller
2nd week. Ardnino Development Environment
3rd week. Basic Structure of Arduino Program
4th week. LED, FND control
5th week. Text LCD, Buzzer control
6th week. DC motor control
7th week. Step motor control
8th week. Push button control

9th week. Light sensor, Sound sensor control
10th week. PIR sensor control
11th week. Temperature, Humidity and Gas sensor control
12th week. Ultrasonic Distance sensor
13th week. Piezo sensor, Gyro sensor control
14th week. RFID reader test
15th week. Bluetooth test
16th week. Wi-Fi test

Sensors and I/O Components

Next picture shows Sensors and I/O devices. They all have Switch to be connected to Arduino module with default wiring, and they have other connector to connect a device to a random pin. Firstly, we study Arduino with default wiring and also we study Control from random wiring. We can see total 20 devices as below.

Package Configurations

Practical Exercises